This is an Eval Central archive copy, find the original at evalacademy.com.
This article is part of a series: How To Enter Survey Data
Part 1: Three Steps for Painless Survey Data Entry
Part 2: Preventing Mistakes in Survey Data Entry
Part 3: Common Issues with Survey Data Entry (and How to Solve Them)
When entering survey data, it is important that it is accurate, easy to analyze, and fast. The best way to meet these goals is to set yourself (or your data entry people) up for success from the beginning.
The old cliché “garbage in, garbage out” certainly applies to survey data entry. Our analysis can only be as good as our data, so it’s critical that the survey data is accurately translated from paper to spreadsheet. But being extra careful while entering data can only go so far – we get tired, we forget, and we make mistakes. Here are three tools you can use to prevent errors in survey data entry by making your spreadsheet foolproof: 1) data validation, 2) colour-coding columns, and 3) a “count” formula.
If you haven’t already set up your survey codebook and data entry spreadsheet, check out the previous article in this series for instructions on how to do so.
1. Data validation
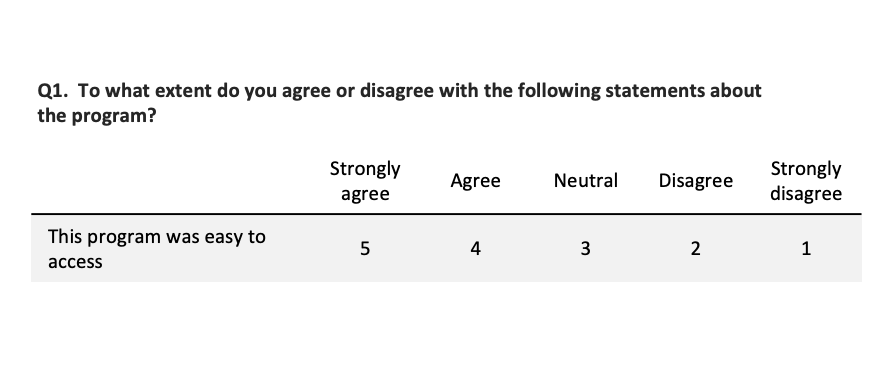
Data validation is your first defence against data entry errors, and it is very simple to implement. Data validation just means defining which values are allowed in which cells. After you have made the survey codebook and data entry spreadsheet, you can set the validation on a question-by-question basis. I will use this survey question as an example:

Question: To what extent do you agree or disagree with the following statements about the program?
Statement: This program was easy to access.
Responses: Strongly agree (5), Agree (4), Neutral (3), Disagree (2), Strongly disagree (1)
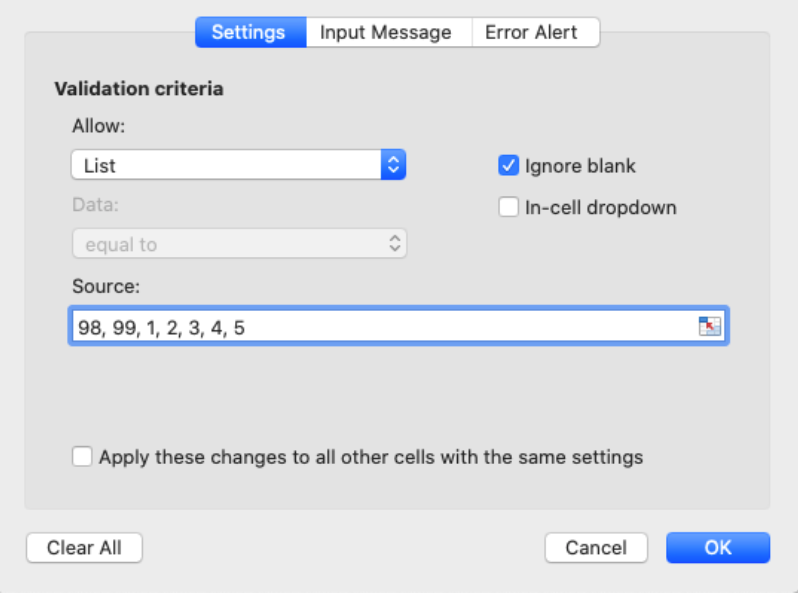
In the spreadsheet for Q1, we want to allow only seven different values to be entered (the five responses 1-5, plus 98 and 99 for “unclear” and “missing/ skipped”). To set up Data Validation in Microsoft Excel, the steps are:
-
Highlight the Q1 column in your data entry spreadsheet
-
Click the “Data” tab in the Microsoft Excel Ribbon
-
Click “Data Validation”
-
Set Allow to “List”
-
Set Source to a list of the allowed values separated by commas (see image below)
-
I choose not to use the “in-cell dropdown” feature because I find it slows down my data entry, but this is up to you.
-
Click “Ok”

How to set up Microsoft Excel Data Validation to accept a list of allowable responses.
Now that data validation is set up, you will receive a pop-up message warning you if you enter a value that isn’t allowed for that question, which will guard against mis-typed data.
2. Colour-code columns
Colour-coding columns is especially helpful for long surveys. I highlight groups of questions in the same colour (e.g., a matrix containing six questions), which gives your eye a visual cue to make sure you’re still entering data in the correct cells of the spreadsheet. In addition to colours, you can also add borders between sections on the survey. For example:

Excel spreadsheet using colours and borders to differentiate survey sections.
By grouping questions together using colour and lines, you provide a visual anchor that helps you keep track of where you are in the data entry spreadsheet.
3. Count cells to make sure you didn’t miss any questions
It’s easy to accidentally skip a question, especially when it is at the end of the page (or maybe the respondent skipped it and you left it blank instead of entering 99). By adding a “count” column at the end of your data entry sheet, you can prevent this mistake. Simply add a column with the Excel formula =COUNTA(*specify the entire row*), then fill this formula down the entire column. This formula will count the number of cells in the row that aren’t blank:

Excel spreadsheet using =COUNTA to ensure all questions have been filled with data.
In the example, the formula for the first row is =COUNTA(A2:P2). As you can see, if every cell is filled in properly (including the ID column), COUNTA will return the value 16 (because there are 16 non-blank cells). I name the count column “Count (16)” so I don’t forget it is supposed to add up to 16. If you accidentally skip a question, like I did on respondent ID#3 Q1b, the COUNTA value will be less than 16. This is a quick way to check when you reach the end of a survey that you didn’t miss any questions.
If your surveys don’t have ID numbers written on them, it can be very difficult or even impossible to go back and find a survey you made a mistake on. For this reason, I recommend checking the Count column at the end of every survey, or at least every few surveys, so it’s easy to flip back in your stack of surveys and find the culprit. Another option is to write the appropriate ID number on the surveys as you go, which gives you the ability to do quality control more easily.
Bonus Tip: Remember to save!
We all know the gut-wrenching feeling of a program crashing and you can’t remember the last time you saved. To avoid this heartbreak, I do a quick CTRL+S or CMD+S (save shortcut) at the end of every page of a survey – if you’re turning the page, save!
Sign up for our newsletter
We’ll let you know about our new content, and curate the best new evaluation resources from around the web!
We respect your privacy.
Thank you!